
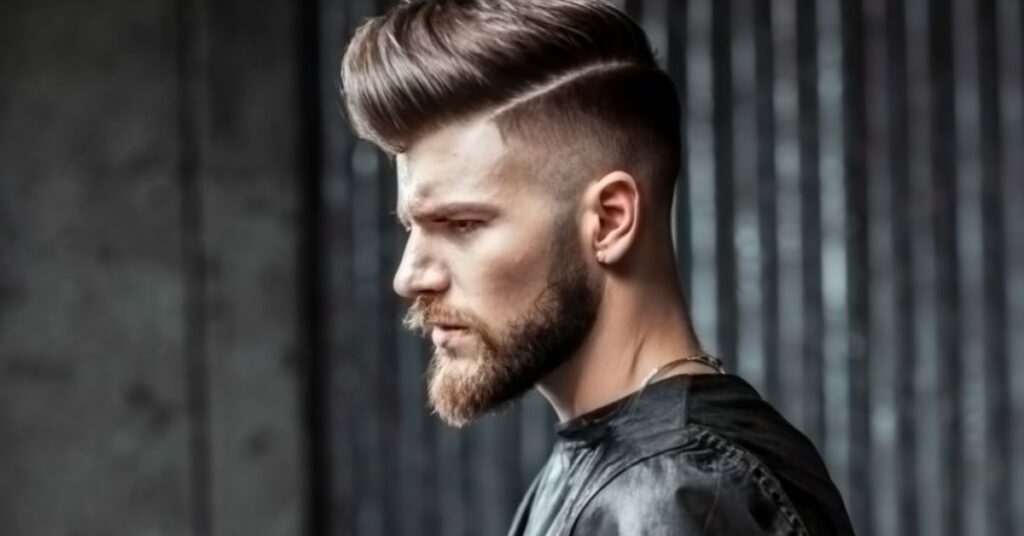
In the world of men’s hairstyles, the taper fade bajo stands out as a classic yet contemporary choice. This versatile cut combines the clean lines of a taper with the edgy appeal of a fade, resulting in a look that’s both sharp and sophisticated. Whether you’re a seasoned barber or someone looking to upgrade their style, this comprehensive guide will walk you through everything you need to know about the taper fade bajo.
Understanding the Different Types of Taper Fades
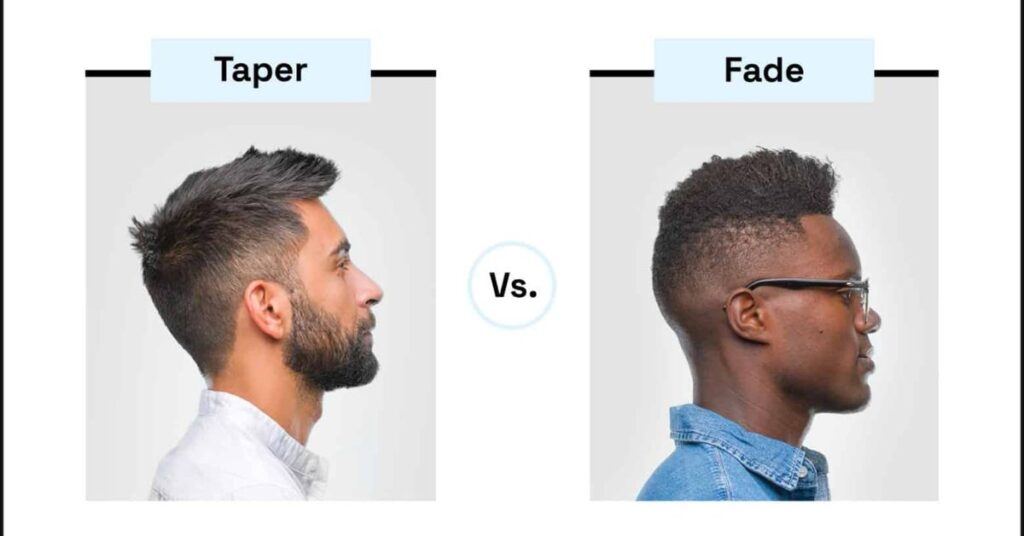
Before diving into the specifics of the taper fade bajo, it’s crucial to understand the variety of taper fades available. Each type offers a unique look and can be customise to suit different face shapes and personal styles.
Low Taper Fade
The low taper fade begins just above the ears and neckline, creating a subtle transition from short to longer hair. This style is perfect for those who want a more conservative look while still enjoying the benefits of a fade.
Mid Taper Fade
Starting at the temples, the mid taper fade offers a balanced look that works well with various hair lengths on top. It’s a versatile option that suits most face shapes.
High Taper Fade
For a bold statement, the high taper fade begins near the crown of the head, creating a dramatic contrast between the sides and the top. This style is ideal for those who want to draw attention to their facial features.
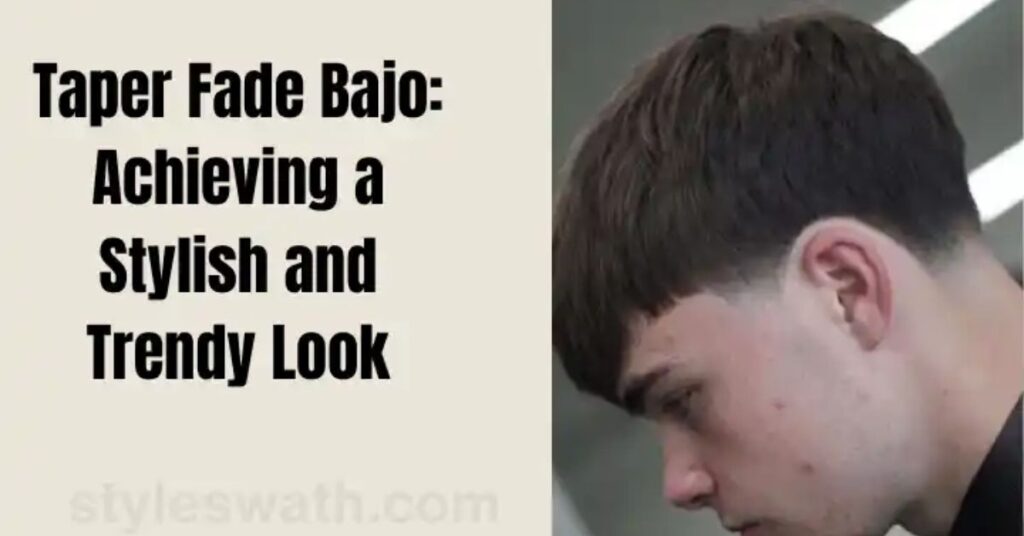
Taper Fade Bajo
The taper fade bajo, our focus for this guide, is a variation that combines elements of both the low and mid taper fades. It creates a smooth transition from very short hair at the bottom to longer lengths as you move up the head.
Here’s a quick comparison table of the different taper fade styles:
| Style | Starting Point | Suitable For | Level of Contrast |
| Low Taper Fade | Just above ears and neckline | Conservative looks | Subtle |
| Mid Taper Fade | At the temples | Versatile, suits most | Moderate |
| High Taper Fade | Near the crown | Bold statements | High |
| Taper Fade Bajo | Between low and mid | Balanced look | Moderate to High |
The Process: Achieving the Taper Fade Bajo
Creating the perfect taper fade bajo requires skill, precision, and the right tools. Let’s break down the process step by step.
Preparing Your Hair for the Taper Fade Bajo
Before you begin cutting, it’s essential to prepare your hair properly. This ensures the best possible results and makes the cutting process smoother.
- Wash and dry your hair: Start with clean, dry hair to ensure accurate cutting.
- Detangle thoroughly: Use a wide-toothed comb to remove any knots or tangles.
- Section your hair: Divide your hair into manageable sections using clips.
- Determine your desired length: Decide how short you want the fade to be at its lowest point.
Choosing the Right Clippers and Guards for the Job
The quality of your tools can make or break your taper fade bajo. Here’s what you’ll need:
- Professional-grade clippers: Look for a model with adjustable blades for precision cutting.
- A set of guard attachments: These allow you to achieve different lengths seamlessly.
- Trimmer: For detailing and creating clean lines.
- Scissors: To blend and texturize longer hair on top.
What is the difference between a low fade and a low taper?
While often confused, low fades and low tapers have distinct characteristics:
- Low Fade:
- Starts very low on the head, typically just above the ears
- Hair “fades” to skin
- Creates a more dramatic contrast
- Low Taper:
- Also starts low but doesn’t necessarily fade to skin
- Gradual decrease in length
- More subtle transition
The taper fade bajo combines elements of both, offering a smooth transition that’s more pronounced than a traditional taper but not as stark as a fade to skin.
Step-by-Step Guide to Achieving the Taper Fade Bajo
Now, let’s dive into the actual process of creating a taper fade bajo:
- Start with the longest length: Use the appropriate guard to trim the top section to your desired length.
- Create your guideline: Using a shorter guard, create a horizontal line around the head where you want the fade to begin. This is typically just above the ears for a taper fade bajo.
- Fade below the guideline: Gradually decrease the guard size as you move down, blending each section into the next.
- Detail the neckline and around the ears: Use your trimmer to create clean, sharp lines.
- Blend and texturize: Use scissors to blend any harsh lines and add texture to the top section.
- Final check and touch-ups: Step back and assess your work. Make any necessary adjustments for a seamless blend.
The key to a perfect taper fade bajo is patience and attention to detail. Take your time with each step, and don’t be afraid to make small adjustments as you go. – Master Barber Carlos Rodriguez
Tips for Achieving a Sharp and Clean Look
To elevate your taper fade bajo from good to great, keep these tips in mind:
- Use a hand mirror: This allows you to check the back and sides of your head easily.
- Work in good lighting: Proper illumination helps you spot any inconsistencies.
- Keep your clippers clean and oiled: This ensures smooth cutting and prolongs the life of your tools.
- Practice on mannequin heads: If you’re new to cutting, this can help you perfect your technique without risk.
Maintaining Your Taper Fade Bajo
A great cut deserves great maintenance. Here’s how to keep your taper fade bajo looking sharp:
- Regular touch-ups: Plan for a trim every 2-3 weeks to maintain the shape.
- Use quality hair products: Invest in good styling products to keep your hair looking its best.
- Protect your hair: Use a hat or SPF product to shield your scalp from sun damage.
- Brush or comb regularly: This helps distribute natural oils and maintain the style.
Styling Options for the Taper Fade Bajo
One of the best things about the taper fade bajo is its versatility. Here are some popular styling options:
- Slicked back: Apply a pomade and comb the top section back for a sleek look.
- Textured and messy: Use a sea salt spray for a tousled, beachy vibe.
- Side part: Create a defined part for a more formal appearance.
- Spiked up: Apply a strong-hold gel and style the top section into spikes for an edgy look.
Common Mistakes to Avoid When Doing a Taper Fade Bajo
Even experienced barbers can make mistakes. Here are some common pitfalls to watch out for:
- Cutting too short too quickly: Always start with a longer guard and gradually go shorter.
- Uneven fading: Take your time to ensure a smooth transition between lengths.
- Neglecting the neckline: Pay attention to creating a clean, well-defined neckline.
- Forgetting to cross-check: Always check your work from multiple angles.
- Using dull blades: Sharp blades give cleaner cuts and reduce the risk of irritation.
The Process: Achieving the Taper Fade Bajo
Creating a perfect taper fade bajo isn’t just about wielding clippers – it’s an art form that requires precision, patience, and a keen eye for detail. Let’s dive into the step-by-step process of achieving this stylish cut.
1. Preparation is Key
Before you even think about cutting, proper preparation sets the stage for success:
- Wash and dry the hair: Start with clean, dry hair to ensure accuracy in cutting.
- Detangle thoroughly: Use a wide-toothed comb to remove any knots or tangles.
- Section the hair: Divide the hair into manageable sections using clips.
- Determine the desired length: Decide how short you want the fade to be at its lowest point.
“Preparation is the secret ingredient in the recipe for a perfect taper fade bajo.” – Celebrity Stylist Maria Rodriguez
2. Choose Your Weapons
Selecting the right tools is crucial. Here’s what you’ll need:
- Professional-grade clippers: Look for a model with adjustable blades for precision cutting.
- Guard attachments: A full set allows for seamless transitions between lengths.
- Trimmer: Essential for detailing and creating clean lines.
- Scissors: Necessary for blending and texturizing longer hair on top.
- Comb: A fine-toothed comb helps in sectioning and guiding your cuts.
3. The Cutting Process
Now, let’s break down the actual cutting process:
Step 1: Start with the Top
- Begin with the longest desired length on top.
- Use scissors or clippers with a long guard to cut the top section to your desired length.
- Work from front to back, ensuring even length throughout.
Step 2: Create Your Guideline
- Choose a shorter guard for your clippers.
- Create a horizontal line around the head where you want the fade to begin.
- For a taper fade bajo, this line typically sits just above the ears.
Step 3: Fade Below the Guideline
- Start with a guard one size shorter than your guideline.
- Work in horizontal strokes, moving downward.
- Gradually decrease the guard size as you move down the head.
- Blend each section into the next for a smooth transition.
Step 4: Detail Work
- Use your trimmer to clean up the neckline and around the ears.
- Create sharp, clean lines to define the style.
- Pay extra attention to the temples and sideburns for a polished look.
Step 5: Blend and Texturize
- Use scissors to blend any harsh lines between different lengths.
- Add texture to the top section by point-cutting or using thinning shears.
Step 6: Final Check and Touch-ups
- Step back and assess your work from different angles.
- Make any necessary adjustments for a seamless blend.
- Use a hand mirror to check the back and sides.
4. The Finishing Touches
To truly perfect your taper fade bajo:
- Apply product: Use a small amount of styling product to enhance the cut’s texture and hold.
- Style as desired: Whether slicked back, textured, or left natural, style according to preference.
- Final trim: Do a last once-over to catch any stray hairs.
Common Challenges and Solutions
Even pros face challenges. Here are some common issues and how to address them:
- Uneven fading: Take your time and frequently step back to check your work.
- Visible lines between lengths: Use a blending technique with your clippers or scissors to soften transitions.
- Cutting too short too quickly: Always start with a longer guard and gradually go shorter.
- Inconsistent length on top: Use a comb as a guide to ensure even cutting.
Maintenance Tips
To keep your taper fade bajo looking sharp:
- Schedule regular touch-ups every 2-3 weeks
- Use quality hair products to maintain the style
- Protect your scalp from sun damage with hats or SPF products
- Brush or comb regularly to distribute natural oils
Frequently Asked Question
How to do the taper fade?
To do a taper fade:
- Start with clean, dry hair sectioned into manageable parts.
- Begin cutting the top to your desired length using scissors or clippers with a long guard.
- Create a guideline around the head where you want the fade to start, typically just above the ears for a taper fade bajo.
- Use clippers with progressively shorter guards as you move down the head, blending each section.
- Detail the neckline and around the ears with a trimmer.
- Blend any harsh lines using scissors or thinning shears.
- Make final touch-ups for a seamless transition.
Remember to work slowly and check your progress frequently from different angles.
Which taper fade is best?
The best taper fade depends on individual preferences and face shape. However, the taper fade bajo is a versatile option that suits many people. It offers a balanced look, combining elements of both low and mid taper fades. This style provides a smooth transition from very short hair at the bottom to longer lengths on top, creating a sharp yet adaptable appearance.
Other popular options include:
- Low taper fade: Subtle and conservative
- Mid taper fade: Versatile and balanced
- High taper fade: Bold and attention-grabbing
The “best” choice ultimately depends on your personal style, maintenance preferences, and facial features.
What face shape suits a taper fade?
Taper fades are versatile and can complement various face shapes. However, certain styles may be more flattering for specific face shapes:
- Oval faces: Can pull off most taper fade styles
- Round faces: Higher taper fades can add length and definition
- Square faces: Low to mid taper fades can soften angular features
- Diamond faces: Low taper fades can balance wider cheekbones
- Heart-shaped faces: Mid to high taper fades can draw attention away from a wider forehead
- Oblong faces: Low taper fades can add width to the sides of the face
The taper fade bajo, being a balanced style, is often suitable for most face shapes. It offers enough versatility to be adjusted slightly to complement individual features.
What to ask for when getting a taper fade?
When asking for a taper fade, be specific about your preferences:
- Specify the type of taper fade you want (low, mid, high, or bajo).
- Describe or show a picture of how short you want the fade at its lowest point.
- Indicate where you want the fade to start (e.g., just above the ears for a taper fade bajo).
- Discuss how you want the top styled (length, texture, direction).
- Mention any specific details you want, such as hard part lines or skin fades.
- Ask about maintenance and how often you’ll need touch-ups.
Conclusion
The taper fade bajo is a versatile and stylish haircut. It offers a clean, sharp look that suits many face shapes. This style combines the best of low and mid taper fades. It’s perfect for those who want a modern yet adaptable appearance.
Achieving the perfect taper fade bajo takes skill and patience. Start with the right tools and take your time. Remember to blend carefully for a smooth transition. Regular maintenance keeps the style looking fresh.
Don’t be afraid to communicate clearly with your barber. Bring a photo if you can. This helps ensure you get the exact look you want. With practice, you can even learn to maintain the style at home.
The taper fade bajo is more than just a haircut. It’s a statement of style and confidence. Whether for work or play, this cut offers a polished look that turns heads. Master the taper fade bajo, and you’ll always look your best.